# 2018
# 八月
# 加载 blob 流图片
const img = new Image();
img.src = window.URL.createObjectURL(this._blob);
img.onload = function() {
  // 获取图片原始尺寸 (IE9+)
  const imgWidth = this.naturalWidth;
  const imgHeight = this.naturalHeight;
  window.URL.revokeObjectURL(img.src);
};
2
3
4
5
6
7
8
# !!含义
!!"false" => true(Boolean)
!!undefined => false
!!123 || !!’abc’ => true
!!是转Boolean的一个技巧,可以得到这个值真正对应的布尔值
2
3
4
# 获取返回头部的 contentType
const contentType = xhr.getResponseHeader("Content-Type");
# 判断问题
有一个现象,就是当 A 对象没有name属性时,去判断A.name !== XXX是返回true的,如果没有name属性,必须先判断A.name是否存在,再去判断它是否不等于 XXX
所以说,像这种写法if(node.data.topicitem.isFavorite),是错误的, 应该改成if(node.data && node.data.topicitem && node.data.topicitem.isFavorite)
# 根据数组里面对象某个字段值进行排序
sortUp: function(data, key) {
  var sort = function (key) {
    return function (objectN, objectM) {
      var valueN = objectN[key]
      var valueM = objectM[key]
      if (valueN < valueM) {
        return 1;
      } else if (valueN > valueM) {
        return -1;
      } else {
        return 0;
      }
    }
  }
    data.sort(sort(key))
}
2
3
4
5
6
7
8
9
10
11
12
13
14
15
16
Tips: 在 sort 函数里面,a < b return 1(降序) a < b return -1(升序)
# 页数计算方法
const totalPages = Math.ceil(总条数/展示的条数)
# cookie 通用方法
const cookieuUtil = {
  // 设置cookie方法
  setCookie: function(key, val, time) {
    // 获取当前时间
    const date = new Date();
    // 将date设置为n天以后的时间
    const expiresDays = time;
    // 格式化为cookie识别的时间
    date.setTime(date.getTime() + expiresDays * 24 * 3600 * 1000);
    // 设置cookie
    document.cookie = key + "=" + val + ";expires=" + date.toGMTString();
  },
  // 获取cookie
  getCookie: function(key) {
    const arr = document.cookie.split("; ");
    let arr2 = [];
    for (let i = 0; i < arr.length; i++) {
      arr2 = arr[i].split("=");
      if (arr2[0] == key) {
        return arr2[1];
      }
    }
    return "";
  },
  // 删除cookie
  delCookie: function(key) {
    this.setCookie(key, "", -1);
  }
};
2
3
4
5
6
7
8
9
10
11
12
13
14
15
16
17
18
19
20
21
22
23
24
25
26
27
28
29
# UMD 模块通用写法
(function(global, factory) {
  // webpack处理
  typeof exports === "object" && typeof module !== "undefined"
    ? (module.exports = factory())
    : // amd
    typeof define === "function" && define.amd
    ? define(factory)
    : // window
      (global.xxx = factory());
})(this, function() {
  "use strict";
  // do something...
  var xxx = `your export module`;
  return xxx;
});
2
3
4
5
6
7
8
9
10
11
12
13
14
15
# 关于 webpack 打包 umd 模块的一些小坑
首先,如果想把一个模块通过<script src>方式引入,挂载到 window 变量上,需要配置 webpack 打包成umd
在导出模块时,如果用了 es6 的export default写法,会有点小坑,例如:
const foo = () => { console.log('hello world'); }
export defaule foo;
2
打包后引入,发现 window 上没有挂载上 foo 变量,研究了打包后的源码,总结下:
// export defaule foo 是把一个对象export出来
  Module{
    default: () => { console.log('hello world') },
    __esModule: true
  }
2
3
4
5
所以foo变量实际上是挂载到了window.default上,只能通过window.default()进行调用
解决办法
const foo = () => { console.log('hello world'); }
export { foo };

// 内部Module对象实际上是
  Module{
    foo: () => { console.log('hello world') },
    __esModule: true
  }
2
3
4
5
6
7
8
如果用module.exports = foo这种方法导出则不会有问题,不过需要这么配置
output: {
  libraryTarget: 'umd',
  library: 'foo' // 比esmodule加多这项
}
2
3
4
# css-background-img 中 center 属性很方便
background: url("./loading-icon.gif") no-repeat center;
# NodeList 转 Array 的多种方法
// 方法一
const array = Array.apply(null, NodeList);
// 方法二
const array = Array.prototype.slice.call(NodeList);
// 方法三
const array = [...NodeList];
2
3
4
5
6
# 一个 tap 技巧
function tap(x, fn = x => x) {
  console.log(fn(x));
  return x;
}
const array = [1, 2, 3, 4, 5];
array.filter(v => tap(v > 2));
array.filter(v => tap(v) > 2);
// tap对于函数式编程很有帮助
2
3
4
5
6
7
8
# 123.toString()为什么会报错
123.toString()相当于123.0toString()
// 解决一
var n = 123;
n.toString();
// 解决二
(123).toString();
123..toString();
123.0.toString();
2
3
4
5
6
7
8
# 用Promise模拟Dojo里的Deferred函数
const Deferred = function() {
  const def = {};
  def.promise = new Promise((resolve, reject) => {
    def.resolve = resolve;
    def.reject = reject;
  });
  return def;
};
// use
const dojoDef = Deferred();
dojoDef.resolve("dojo-deferred-done");
dojoDef.promise.then(res => {
  console.log(res);
});
2
3
4
5
6
7
8
9
10
11
12
13
14
# 九月
# Promise.finaly 实现方法
Promise.prototype.finally = function(callback) {
  let P = this.constructor;
  return this.then(
    value => P.resolve(callback()).then(() => value),
    reason =>
      P.resolve(callback()).then(() => {
        throw reason;
      })
  );
};
// use
Promise.resolve("done").finally(() => {
  console.log("done");
});
Promise.reject("error").finally(() => {
  console.log("error");
});
2
3
4
5
6
7
8
9
10
11
12
13
14
15
16
17
# Merge 对象
// 合并对象(不会覆盖对象已有的属性)
function merge(obj = {}, defaults) {
  const has = Object.prototype.hasOwnProperty;
  for (const key in defaults) {
    // 确保不会合并default原型链上的属性
    if (has.call(defaults, key)) {
      if (typeof obj[key] === "undefined") {
        obj[key] = defaults[key];
      }
    }
  }
  return obj;
}
2
3
4
5
6
7
8
9
10
11
12
13
# Event lop
微任务包括 process.nextTick ,promise ,Object.observe ,MutationObserver
宏任务包括 script , setTimeout ,setInterval ,setImmediate ,I/O ,UI rendering
- 执行一个宏任务(栈中没有就从事件队列中获取)
- 执行过程中如果遇到微任务,就将它添加到微任务的任务队列中
- 宏任务执行完毕后,立即执行当前微任务队列中的所有微任务(依次执行)
- 当前宏任务执行完毕,开始检查渲染,然后 GUI 线程接管渲染
- 渲染完毕后,JS 线程继续接管,开始下一个宏任务(从事件队列中获取)
# 解析 url 参数
/**
 * 解析url参数
 * @example ?id=123&a=b
 * @return Object {id:123, a:b}
 *
 */
function urlParse() {
  const url = window.location.search;
  const obj = {};
  const reg = /[?&][^?&]+=[^?&]+/g; // ?/&开头 + 非?&至少一个 = + 非?&至少一个
  const arr = url.match(reg);
  if (arr) {
    arr.forEach(item => {
      let tempArr = item.substring(1).split("=");
      let key = decodeURIComponent(tempArr[0]);
      let value = decodeURIComponent(tempArr[1]);
      obj[key] = value;
    });
  }
  return obj;
}
2
3
4
5
6
7
8
9
10
11
12
13
14
15
16
17
18
19
20
21
# ESlint
"off" or "0":表示这个规则关闭,
"warn" or "1":表示这个规则是一个警告处理
"error" or "2":表示这个规则是一个错误处理
2
3
# vscode 小技巧
跳回之前的位置
control + -
跳到当前光标的位置
option + ←
# 关于 ES6 的 class
class A {
  constructor() {
    console.log(this);
    console.log(new.target.name);
  }
}

class B extends A {
  constructor() {
    // super代表父类的构造函数的constructor
    super();// 相当于A.call(this)
    // 只有调用super()之后,才能使用this,因为子类实例的构建,是基于对父类实例加工,执行super方法才返回父类实例
    console.log(this);
  }
}

// 派生类上可以忽略constructor,它是等效于上面的写法
class B extends A {
  ...
}

// B函数内super执行时,super内的this指向b,A.prototype.constructor.call(this)
const b = new B();

// Object.getPrototypeOf方法可以用来从子类上获取父类
console.log(Object.getPrototypeOf(B));// Function:A

// 一些原型链的指向
b._proto__ => B.prototype => B.prototype.__proto__ => A.prototype =>  A.prototype.__proto__ => Object.prototype => Object.prototype.__proto__ => null

// ES5模拟ES6类的继承实现
function A () {}
A.prototype.test = function() {}

function B() {
  A.call(this);
}
// Object.create
B.prototype = Object.create(A.prototype, {
  constructor: {
    value: B,
    enumerable: true,
    writable: true,
    configurable: true
  }
})
2
3
4
5
6
7
8
9
10
11
12
13
14
15
16
17
18
19
20
21
22
23
24
25
26
27
28
29
30
31
32
33
34
35
36
37
38
39
40
41
42
43
44
45
46
# git 常用合并命令
稳妥点合并
- git fetch origin xxx
- git diff xxx
- git merge origin/xxx
暴力合并
- git pull origin xxx
# git 更新文件冲突解决方案
如果工作区还没有 add 和 commit,直接 git pull 会产生以下提示:
Please,commit your changes or stash them before you can merge.
解决方案有 2 种:
- 保留本地修改,不被新的修改覆盖
- git stash (保留本地修改,还没有 add 和 commit)
- git pull (更新)
- git stash pop (回到本地更改)
- 如果想让远程代码完全覆盖本地代码的修改
- git reset -hard
- git pull
# 关于 weakmap
weak map 是只包含对象键的特殊 map。和 weak set 类似,键的是弱对象引用,因此当其为仅存的某个对象的引用时,垃圾回收不会被阻止。当键被垃圾回收器清理之后,所关联的值也一并销毁。当想要将额外的信息附加到生命周期可由外部代码控制的对象上时,带有内存管理的 weak map 类型是唯一适合的。
使用 weakmap 模拟实例对象私有变量
let Widget = (function() {
  let privateData = new WeakMap();

  function Widget(id) {
    privateData.set(this, { id: id });
  }

  Widget.prototype.getId = function() {
    return privateData.get(this).id;
  };

  return Widget;
})();

const w = new Widget("123456789");
w.getId(); // '123456789';
w = null; // privateData解除对w的引用,id(值)会一并被销毁
2
3
4
5
6
7
8
9
10
11
12
13
14
15
16
17
# ajax 并发请求
const url = "";

// async/await
async function asyncGetUrl() {
  const promise1 = fetch(url).then(res => res.json());
  const promise2 = fetch(url).then(res => res.json());
  const res1 = await promise1;
  const res2 = await promise2;
  console.log(res1, res2);
}

// promise all
async function allGetUrl() {
  const promise1 = fetch(url).then(res => res.json());
  const promise2 = fetch(url).then(res => res.json());
  const [res1, res2] = await Promise.all([promise1, promise2]);
  console.log(res1, res2);
}
2
3
4
5
6
7
8
9
10
11
12
13
14
15
16
17
18
# bash 一个小坑
今天打算写个 shell 脚本来发布到 github 上,commit 的信息就定为当前时间,于是就这么写了
time="📝"$(date +"%Y-%m-%d %H:%M:%S")

git add .
git commit -m $time
git push origin master
2
3
4
5
然后发现报错无法进行,于是直接把echo "📝"$(date +"%Y-%m-%d %H:%M:%S")这句话丢到 zsh 上跑,发现又没问题,觉得很奇怪,为什么取变量遇到空格就中断了呢??
谷歌了很久,终于在一本在线书籍上找到答案
a=`ls -l`
echo $a           # 不带引号,移除所有的制表符与分行符
echo "$a"         # 带引号,会保留空白符
2
3
所以,以上问题得到解决
git commit -m "$time"
# 元素节点中的 children 和 childNodes 的区别
const el = document.querySelector('.el');

// children只包含元素节点
el.children

// childNodes包含元素节点和文本节点(空白的text也算)
el.childNodes

// 如果想在childNodes中判断非文本节点
xxx.nodeType != 3

// 关于nodeType值
nodeType: {
  1: 元素节点,
  2: 属性节点,
  3: 文本节点
}
2
3
4
5
6
7
8
9
10
11
12
13
14
15
16
17
# Element.matches--polyfill
matches 可用于事件代理进行元素判断
if (!Element.prototype.matches) {
  Element.prototype.matches =
    Element.prototype.matchesSelector ||
    Element.prototype.mozMatchesSelector ||
    Element.prototype.msMatchesSelector ||
    Element.prototype.oMatchesSelector ||
    Element.prototype.webkitMatchesSelector ||
    function(s) {
      var matches = (this.document || this.ownerDocument).querySelectorAll(s),
        i = matches.length;
      while (--i >= 0 && matches.item(i) !== this) {}
      return i > -1;
    };
}
2
3
4
5
6
7
8
9
10
11
12
13
14
# 关于 delete 注意点
var a = 1;
// delete无法删除已经声明的变量
/* 通过变量声明生成全局对象的属性,拥有DontDelete */
delete a; // false

a = 1;
/* 通过未声明的变量赋值生成全局对象的属性,没有DontDelete */
delete a; // true
2
3
4
5
6
7
8
# canvas.toDataURL('image/png') 跨域报错的解决方案
const img = new Image();
// 在chrome68浏览器中,如果设src在设crossOrigin属性之前,同样会报错
// 所以先设crossOrigin属性,解决跨域,再设src
img.setAttribute("crossOrigin", "anonymous");
img.src = "xxx";
2
3
4
5
# git 创建独立的分支
git checkout --orphan 新分支名 <start_point>

## 删除此分支中的索引及索引中的所有文件
git rm -rf .
2
3
4
# vim 底线命令
q 不保存,直接退出
q! 不保存,并强制退出
e! 放弃所有修改,从上次保存文件开始再编辑
w 保存文件,但不退出
w! 强制保存,不退出
wq或x 保存,并退出
wq! 强制保存,并退出
2
3
4
5
6
7
# 一些 ss 的命令
## 登录ssh
ssh root@xxx

## 安装ss
yum install epel-release
yum install python-pip
yum install python-setuptools m2crypto supervisor
pip install shadowsocks

## 配置ss
mkdir /etc/shadowsocks
vim /etc/shadowsocks/config.json

{
  "server":"0.0.0.0",
  "server_port":1000,
  "local_address": "127.0.0.1",
  "local_port":1080,
  "password":"123456",
  "timeout":300,
  "method":"aes-256-cfb",
  "fast_open": false
}

## 开启ss
ssserver -c /etc/shadowsocks/config.json -d start
## 关闭ss
ssserver -c /etc/shadowsocks/config.json -d stop

## 开机启动
vi /etc/rc.local
## 添加启动命令
ssserver -c /etc/shadowsocks/config.json -d start

## bbr加速
wget –no-check-certificate https://github.com/teddysun/across/raw/master/bbr.sh
chmod +x bbr.sh
./bbr.sh

## 重启
2
3
4
5
6
7
8
9
10
11
12
13
14
15
16
17
18
19
20
21
22
23
24
25
26
27
28
29
30
31
32
33
34
35
36
37
38
39
40
# vue svg-icon 方案
安装 svg-sprite-loader
yarn add svg-sprite-loader --dev
添加 webpack 配置
// vuecli3
chainWebpack: config => {
  // use svg
  const svgRule = config.module.rule('svg')
  svgRule.uses.clear()
  svgRule
    .include
    .add(resolve('src/icons/svg'))
    .end()
    .use('svg-sprite-loader')
    .loader('svg-sprite-loader')
    .options({
      symbolId: 'icon-[name]'
    })
    .end()
  // image exclude svg
  const imagesRule = config.module.rule('images')
    imagesRule
    .test(/\.(png|jpe?g|gif|webp|svg)(\?.*)?$/)
    .exclude
    .add(resolve('src/icons/svg'))
    .end()
}

// vuecli2
{
  test: /\.svg$/,
  loader: 'svg-sprite-loader',
  include: [resolve('src/icons')],
  options: {
    symbolId: 'icon-[name]'
  }
},

// 注册全局组件
import Vue from 'vue'
import SvgIcon from '@/components/SvgIcon'// svg组件

// register globally
Vue.component('svg-icon', SvgIcon)

const requireAll = requireContext => requireContext.keys().map(requireContext)
const req = require.context('./svg', false, /\.svg$/)
requireAll(req)
2
3
4
5
6
7
8
9
10
11
12
13
14
15
16
17
18
19
20
21
22
23
24
25
26
27
28
29
30
31
32
33
34
35
36
37
38
39
40
41
42
43
44
SvgIcon
<template>
  <svg
    :style="svgColor"
    fill="currentColor"
    :class="svgClass"
    aria-hidden="true"
  >
    <use :xlink:href="iconName"></use>
  </svg>
</template>

<script>
export default {
  name: "svg-icon",
  props: {
    iconClass: {
      type: String,
      required: true
    },
    className: {
      type: String
    },
    color: {
      type: String
    }
  },
  computed: {
    iconName() {
      return `#icon-${this.iconClass}`;
    },
    svgClass() {
      if (this.className) {
        return "svg-icon " + this.className;
      } else {
        return "svg-icon";
      }
    },
    svgColor() {
      if (this.color) {
        return {
          color: this.color
        };
      } else {
        return "";
      }
    }
  }
};
</script>

<style scoped>
.svg-icon {
  width: 1em;
  height: 1em;
  vertical-align: -0.15em;
  fill: currentColor;
  overflow: hidden;
}
</style>
2
3
4
5
6
7
8
9
10
11
12
13
14
15
16
17
18
19
20
21
22
23
24
25
26
27
28
29
30
31
32
33
34
35
36
37
38
39
40
41
42
43
44
45
46
47
48
49
50
51
52
53
54
55
56
57
58
59
# vue .native 修饰符
现在在组件上使用 v-on 只会监听自定义事件 (组件用 $emit 触发的事件)。如果要监听根元素的原生事件,可以使用 .native 修饰符 相当于把组件监听原生 dom 事件的方式
# export 注意的
const foo = 123
export { foo } => import { foo }
export default { foo } => import * as foo // 其实导出的是模块的default属性
// 一般来说,不建议使用export default { xxx } 这种写法
2
3
4
# tree ignore
tree -I "node_modules|bower_components"
# gitignore
.gitignore 只能忽略那些原来没有被 track 的文件,如果某些文件已经被纳入了版本管理中,则修改.gitignore 是无效的。那么解决方法就是先把本地缓存删除(改变成未 track 状态),然后再提交。
git rm -r --cached .
git add .
git commit -m 'update .gitignore'
2
3
# sass calc 取值
height: calc(100% - #{$headerHeight + $stepHeight + $footerHeight});
# vue-transition 组件 mode
in-out:新元素先进行过渡,完成之后当前元素过渡离开。
out-in:当前元素先进行过渡,完成之后新元素过渡进入。
# Array.fill 小坑
有个需求,我要往一个新数组里的全部对象加个`index
const array = Array(10)
  .fill({})
  .map((v, i) => {
    v.index = i + 1;
    return v;
  });
2
3
4
5
6
然而你会发现
[{index: 10}, {index: 10}, ...] // 所有index都是同一个值
查阅 MDN 文档
当一个对象被传递给 fill 方法的时候, 填充数组的是这个对象的引用
所以,所有后面对象 index 值的改变,都会改变前面的值
# 十月
# vue 的v-model
v-model是v-bind:value和v-on:input和语法糖
<div id="app">
  <input v-model="value" type="text" />
  <input :value="value" type="text" @input="value = $event.target.value" />
  <custom-input v-model="value" />
</div>
2
3
4
5
其中,custom-input 的写法
Vue.component("custom-input", {
  props: ["value"],
  template: `
    <input
      :value="value"
      @input="$emit('input', $event.target.value)"
    >
  `
});
2
3
4
5
6
7
8
9
# vue 子组件改变 props 的方法
由于 vue 遵循单向数据流,不建议在子组件里面直接改变 props 的值,一般通过 2 种方法
通过
$emit父组件事件来改变父组件传给子组件的值,然后在子组件里面watchprops 的值,状态变化时触发相关反应给 props 加个对象字段,如:
props: ['state'],

template: <span>{{state.someData.value}}</span>

// 改
js: this.state.someData.value = xxx; // 直接改变了父组件的data值
2
3
4
5
6
# 生成 uuid
const guid = () => {
  return "xxxxxxxx-xxxx-4xxx-yxxx-xxxxxxxxxxxx".replace(/[xy]/g, function(c) {
    const r = (Math.random() * 16) | 0,
      v = c == "x" ? r : (r & 0x3) | 0x8;
    return v.toString(16);
  });
};
2
3
4
5
6
7
# 事件代理的优点
动态生成的节点如果是绑定同一事件,应该把事件注册到动态节点的父节点上,这样就不需要对子节点逐一进行注销操作了
节省内存
# Array-chunk
const chunk = (arr, size) =>
  Array.from({ length: Math.ceil(arr.length / size) }, (v, i) =>
    arr.slice(i * size, i * size + size)
  );
// chunk([1,2,3,4,5],2) => [[1,2],[3,4,5]]
2
3
4
5
# Vue 组件 style
在使用 vue 组件时,如果想给该组件加个行内 style,需要:style="{}"这种写法,直接写style不会生效
# 深度扁平化数组
const deepFlatten = arr => [].concat(...arr.map(v => (Array.isArray(v) ? deepFlatten(v) : v)))

deepFlatten([1,[2],[[3]]]) => [1,2,3]
2
3
# 找出两个数组中不同的值
const differenceWith = (arr, val, comp) =>
  arr.filter(a => val.findIndex(b => comp(a, b)) === -1);

differenceWith(
  [1, 1.2, 1.5, 3, 0],
  [1.9, 3, 0],
  (a, b) => Math.round(a) === Math.round(b)
); // [1, 1.2]
2
3
4
5
6
7
8
# 关于浏览器全屏 API
通过一个元素requestFullscreen和exitFullscreen(需要加上浏览器前缀)进行触发,还有通过监听 document 的fullscreenchange事件来进行相关操作
# 三角函数
弧度 = 角度 * Math.PI / 180
角度 = 弧度 * 180 / Math.PI
# vue data 属性不被代理的方法
const app = new Vue({
  data: {
    _app: "",
    $ppa: ""
  }
});
// 以上_app,$ppa都不会被代理,只要加了_和$开头的属性都不会被vue代理
2
3
4
5
6
7
# event.currentTarget
当事件遍历 DOM 时,标识事件的当前目标。它总是引用事件处理程序附加到的元素,而不是 event.target,event.target 标识事件发生的元素。
简单来说,就是指向绑定 addEventListener 的那个元素
当将相同的事件处理程序附加到多个元素时,event.currentTarget 非常实用
<body>
  <div id="box"></div>
</body>
2
3
const handle = function(event) {
  console.log(event.currentTarget);
  console.log(event.target);
};

// 点击box
// 分别打印 body元素、box元素
document.body.addEventListener("click", handle, false);

// 点击box
// 分别打印 box元素、box元素
document.querySelector("#box").addEventListener("click", handle, false);
2
3
4
5
6
7
8
9
10
11
12
# vuecli3 传递全局变量
文档实例:
// vue.config.js
module.exports = {
  css: {
    loaderOptions: {
      // 给 sass-loader 传递选项
      sass: {
        // @/ 是 src/ 的别名
        // 所以这里假设你有 `src/variables.scss` 这个文件
        data: `@import "@/variables.scss";`
      }
    }
  }
};
2
3
4
5
6
7
8
9
10
11
12
13
注意: 如果第一个加载的 vue 组件,<style>处声明了scoped,那么上面传递的全局变量也会被前缀处理
解决方法:
第一个组件(通常 App.vue)style 处声明lang='scss'且不能声明scoped
# vue render 函数用组件的 v-model
比如,iview的Poptip组件有用到v-model,如果在外面render函数里,是无法使用v-model的,所以,需要以下这种写法:
export default {
  name: 'render',
  data() {
    return {
      visible: false
    }
  },
  render(h) {
    const vm = this
    // 其实是把v-model拆成value和oninput
    // 这样就可以用this.visible控制Poptip是否显示
    return h('div',[
      h('Poptip', {
        props: {
          value: vm.visible
        },
        on: {
          input: (e) => {
            this.visible = e
          }
        }
      }
    ])
  }
}
2
3
4
5
6
7
8
9
10
11
12
13
14
15
16
17
18
19
20
21
22
23
24
25
# 十一月
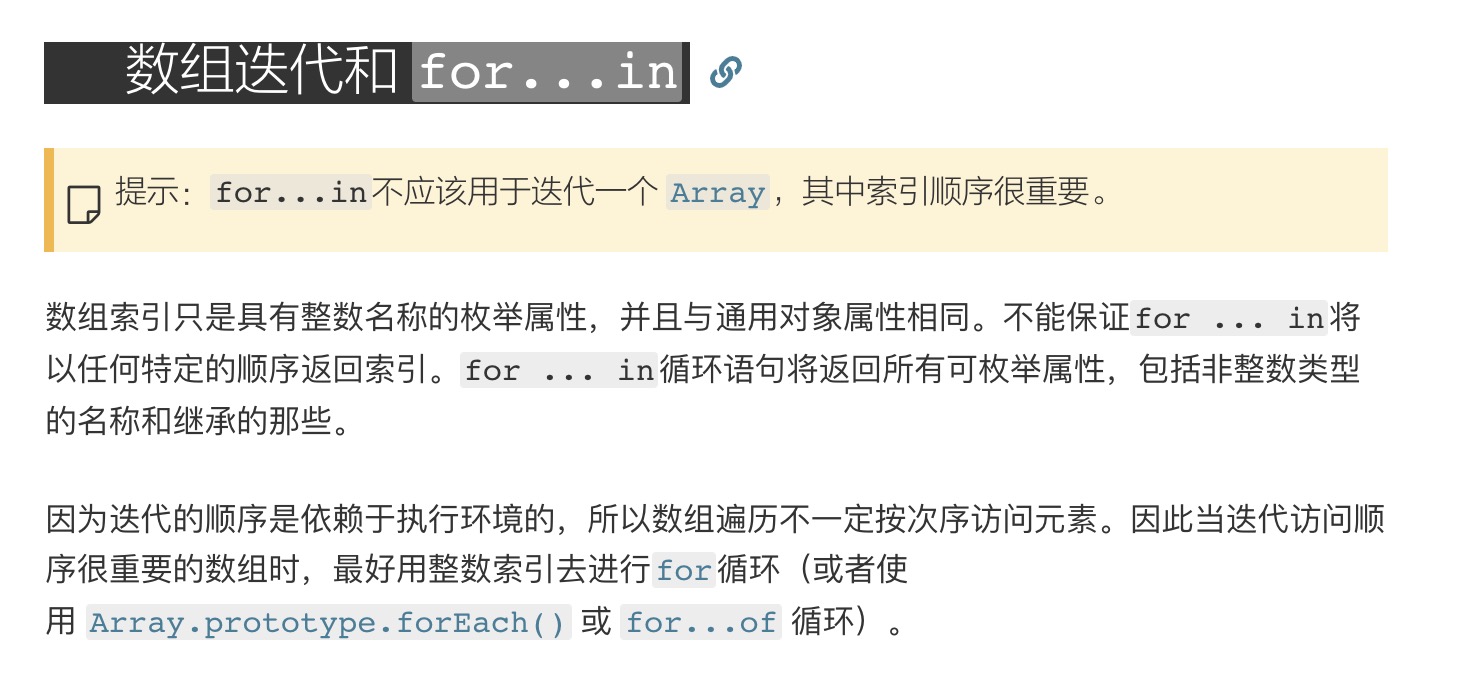
# 为什么不用 for-in 遍历数组
MDN 文档上的解析
比如:
const arr = [];

Object.defineProperty(arr, "0", {
  value: 1,
  enumerable: false
});

arr.push(2);

for (let i in arr) {
  console.log(i); // 只会打印 1
  console.log(arr[i]); // 只会打印 2
}

// 用 for of
for (let i of arr) {
  console.log(i); // 1、2 均可打印
}
2
3
4
5
6
7
8
9
10
11
12
13
14
15
16
17
18
# vue 模板解析报错
[Vue warn]: You are using the runtime-only build of Vue where the template compiler is not available. Either pre-compile the templates into render functions, or use the compiler-included build.
vue.config.js增加别名:
module.exports = {
  configureWebpack: {
    resolve: {
      alias: {
        'vue$': 'vue/dist/vue.esm.js'
      }
    }
  }
2
3
4
5
6
7
8
# eslint 行禁用
alert("foo"); // eslint-disable-line

// eslint-disable-next-line
alert("foo");

/* eslint-disable-next-line */
alert("foo");

alert("foo"); /* eslint-disable-line */
2
3
4
5
6
7
8
9
# vue-router 为 history 时请求本地 static 的小坑
如果vue-router使用history模式,比如在http://localhost:8080/about/home页面下,发起本地 json 文件ajax请求
this.$http.get("static/foo.json").then(res => {
  console.log(res);
});
2
3
这时控制台会发出 404 报错,GET http://localhost:8080/about/static/foo.json 404 (Not Found)
问题在于发起的请求地址是错的,应该是http://localhost:8080/static/foo.json才对
对这种问题,有 2 种方法
static前面加个/,this.$http.get('/static/foo.json'),但这种情况打包路径要额外处理(建议使用绝对路径)vue-router 模式改为
hash模式
# axios 请求图片流
axios({
  url: "",
  method: "",
  responseType: "blob"
});
2
3
4
5
# 文本溢出出现省略号…的方法
/* 注意需要设置宽度,如果是 inline 元素还需要设置 display为块才能有效果,width 不能设置 100% ,这样就到达父容器的全部了 */
display: inline-block;
width: 60%;

/* 省略代码 */
overflow: hidden;
white-space: nowrap;
text-overflow: ellipsis;
2
3
4
5
6
7
8
进行 scss 封装
// 出现...
@mixin ellipsis {
  overflow: hidden;
  text-overflow: ellipsis;
  white-space: nowrap;
}
// 使用
@include ellipsis
2
3
4
5
6
7
8
应用 iview 组件
<Tooltip transfer max-width="200" content="包括各种表单项,比如输入框、选择器、开关、单选框、多选框等。" placement="bottom">
  <span class="panel-title">包括各种表单项,比如输入框、选择器、开关、单选框、多选框等。</span>
</Tooltip>
2
3
# 简洁的对象合并 polyfill
const __assign = function() {
  __assign =
    Object.assign ||
    function(t) {
      for (let s, i = 1, n = arguments.length; i < n; i++) {
        s = arguments[i];
        for (let p in s)
          if (Object.prototype.hasOwnProperty.call(s, p)) t[p] = s[p];
      }
      return t;
    };
  return __assign.apply(this, arguments);
};
2
3
4
5
6
7
8
9
10
11
12
13
# 注册所有 vue 全局组件方式
关于require.context()方法:
- 要搜索的文件夹目录,如 '.', './componets'
- 是否还应该搜索它的子目录
- 以及一个匹配文件的正则表达式
import Vue from "vue";

// 检索目录下的模块
const req = require.context(".", true, /\.vue$/);

// require.context模块导出(返回)一个(require)函数,这个函数可以接收一个参数

/* ƒ webpackContext(req) {
	var id = webpackContextResolve(req);
	return __webpack_require__(id);
}
*/

req.keys().forEach(fileName => {
  // require模块
  const componentConfig = req(fileName);
  const name =
    fileName.name ||
    fileName
      .replace(/^\.\/.*\//, "")
      .replace(/\.vue$/, "")
      .toLowerCase();
  Vue.component(name, componentConfig.default || componentConfig);
});
2
3
4
5
6
7
8
9
10
11
12
13
14
15
16
17
18
19
20
21
22
23
24
# 用 vue jsx 渲染简单的 tree
methods: {
  createdNode(data, listItems = [], level = 0) {
    data.forEach(v => {
      if (v.children && v.children.length !== 0) {
        listItems.push(
          <li class="tree-node" style={{paddingLeft: `${level*16}px`}}>
            <i class="tree-node-arrow" />
            {v.label}
          </li>
        );
        return this.createdNode(v.children, listItems, level + 1);
      }
      listItems.push(<li class="tree-node" style={{paddingLeft: `${level*16}px`}}>{v.label}</li>);
    });
    return listItems;
  }
},
render(h) {
  return <ul class="tree">{this.createdNode(this.data)}</ul>;
}
2
3
4
5
6
7
8
9
10
11
12
13
14
15
16
17
18
19
20
# forEach 无法跳出循环
没有办法中止或者跳出 forEach 循环,除了抛出一个异常。
const arr = [1, 2, 3];
arr.forEach(v => {
  if (v === 2) {
    return; // 只会结束本次回调
  }
  console.log(v); // 1, 3
});
2
3
4
5
6
7
取而代之的方法是使用普通的 for 循环或者 some,every
// some
const arr = [1, 2, 3];
arr.some(v => {
  if (v === 2) {
    return true;
  }
  console.log(v); // 1
});

// every
arr.every(v => {
  if (v === 2) {
    return false;
  }
  console.log(v); // 1
});
2
3
4
5
6
7
8
9
10
11
12
13
14
15
16
# 一个有用的 range 函数
const range = (start, end) => Array.from({ length: end - start + 1 },
(x,i) => i + start)

const res = range(1, 10)
console.log(res) => [1, ..., 10]
2
3
4
5
# 十二月
# vscode 开启别名路径提示
一般上了webpack的项目都会进行别名配置,比如用@映射src,vscode 默认是不会开启别名路径提示的,需要手动配置
首先在项目根目录下加个jsconfig.json
{
  "compilerOptions": {
    "baseUrl": ".",
    "paths": {
      "@/*": ["src/*"]
    },
    "target": "ES6",
    "module": "commonjs",
    "allowSyntheticDefaultImports": true
  },
  "include": ["src/**/*"],
  "exclude": ["node_modules"]
}
2
3
4
5
6
7
8
9
10
11
12
13
如果想在.vue文件中生效,需要:
安装path-intellisense插件,在setting.json中加上
"path-intellisense.mappings": {
  "@": "${workspaceRoot}/src"
}
2
3
这样就可以在普通js文件,和.vue文件里面都会有别名的路径提示和自动补全了
# vue 组件命名
单文件组件的文件名应该要么始终是单词大写开头 (PascalCase),要么始终是横线连接 (kebab-case)。
// (PascalCase)方式命名一个组件
Vue.component("NrLayCom", {
  template: `<div>123</div>`
});
2
3
4
调用方法:
<!-- 方式一 -->
<NrLayCom></NrLayCom>
<!-- 方式二 -->
<nr-lay-com></nr-lay-com>
2
3
4
用PascalCase方式命名的组件,可以用kebab-case方式进行调用, 但是,用kebab-case命名的组件,则不能用PascalCase方式进行调用
开发时,建议统一只用一种方式,不要两者混用
# mac 命名行开启 xcode 虚拟机
查看可用虚拟机
xcrun instruments -s
开启指定虚拟机
xcrun instruments -w "iPhone X (12.1)"
# 本地仓库设置 config
展示 config:
git config --local --list (当前目录)
git config --global --list (全局)
2
修改:
git config user.name xxxx
git config user.email xxxx@xxx.com
2
# 修改上一个 commit 的描述
git commit --amend
# vue 动态组件 :is 的值
component :is里面的值,可以是组件对象,或者函数(返回Promise),或者是字符串(已经注册的组件的name)
# console.log 调试注意的
由于console.log机制,调试对象时是指向同一个地址,所以涉及到异步更新时,执行时和打印时的结果不一致,需要这么处理
console.log(JSON.stringify(xxx));
# vue 高级动态组件
// 高级动态组件
// 返回一个对象,在component选项里面返回promise(resolve)
Vue.component("hcom", () => {
  return {
    // 异步组件加载时使用的组件
    loading: {
      render(h) {
        return h("div", "loading");
      }
    },
    // 加载失败时使用的组件
    error: {
      render(h) {
        return h("div", "error");
      }
    },
    // 展示加载时组件的延时时间。默认值是 200 (毫秒)
    delay: 0,
    component: new Promise(resolve => {
      setTimeout(() => {
        resolve({
          render(h) {
            return h("div", "高级动态组件");
          }
        });
      }, 2000);
    })
  };
});
2
3
4
5
6
7
8
9
10
11
12
13
14
15
16
17
18
19
20
21
22
23
24
25
26
27
28
29
# 只能用 new 来调用函数
function Person(name) {
  if (!(this instanceof Person)) {
    throw new TypeError("Cannot call a class as a function");
  }
  this.name = name;
}

const P = new Person("P");
Person("p"); // "Cannot call a class as a function"
2
3
4
5
6
7
8
9
# 关于 proto
__proto__是用来获取对象的原型,现在推荐使用Object.getPrototypeOf()来获取
# 命令行大法好
open -a xxx 打开软件
open -e
详情请看 open --help